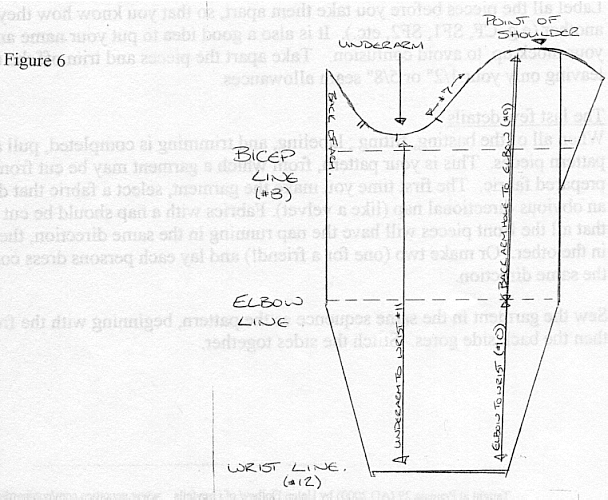
SleevesThe sleeve can be the most trying part of this whole process. Sleeves should allow the wearer a good range of motion without discomfort. These sleeves will not fit or feel like modern knitted clothing: you cannot have an unlimited range of movement without the sleeves being baggy. The following measurements are useful for sleeves:

The most important measurement is the bicep. Combined with the chest fit, the two work together to make a comfortable bodice. If this step is done incorrectly, the entire garment will be uncomfortable to wear. If the sleeve is too tight then the wearer will not be able to raise their arm properly, and if it is too loose, the sleeve will bulge and hang. Another area that is very important to the fit is the depth of the curve at the top of the sleeve. The deeper the curve, the wider the bicep line needs to be, because it will fit closer to the upper arm. This fit is important for the hang of the sleeve. Design the sleeve on paper, and then cut one out of muslin. Begin sewing the sleeve by attaching the gore. Sew the straight edge to the back seam, with the curved edge placed to help complete the armhole of the sleeve. Then sew the seam from the top to the elbow, where it will be necessary to turn the seam slightly and adjust the two layers at the end of the gore. (If there are no buttons on the sleeve, continue to the wrist) To check the fit of the sleeve, slip it into the armhole and baste. When the basting is finished, hold up the garment to see if the sleeve hangs without any puckers and lays smoothly. Try it on again to see if there is free movement by crossing the arms in front and back, lifting them over the head, sitting, and walking. You may need to try a couple of combinations of width of bicep and depth of armhole to get one that suits you. This is why we make mock ups! Remember too, when you think you have found the perfect sleeve, to make one for each side to ensure that it has the right combination of fit over the whole torso/bodice area. |